Custom PDF Merge allows you to upload fillable PDF forms and map a user's FormFlow form answers to the PDF fields. The Custom PDF Merge functionality is listed under Tools in the form menu. This a form-specific tool which means it will need to be applied to each form you wish to use it with.
Completed PDF forms are not accessible via JICS but can be accessed by sending the completed PDF form to a designated email address as an attachment.
Add and Map a Fillable PDF to a Form
Navigate to the FormFlow - Forms instance.
Click the Manage Forms link. The Manage Forms page appears.
Click the form you wish to configure the custom PDF for. The form opens up in the window.
Click the Tools drop-down from the FormFlow menu and select Custom PDF Merge. The custom PDF merge page appears.
Click the Choose a file button. A browser window opens.
Navigate to and select the fillable PDF you wish to upload.
|
This must be a valid fillable PDF created in a program such as Adobe Acrobat. |
Click Open. The name of the file now displays on the page.
Click the Upload file button. More custom PDF merge options appear.
If you wish to replace the file you uploaded, click the Update button next to the Current PDF Document option. The currently uploaded PDF is removed and you are directed to the PDF upload screen. Follow steps 6-8 to select a new PDF file.
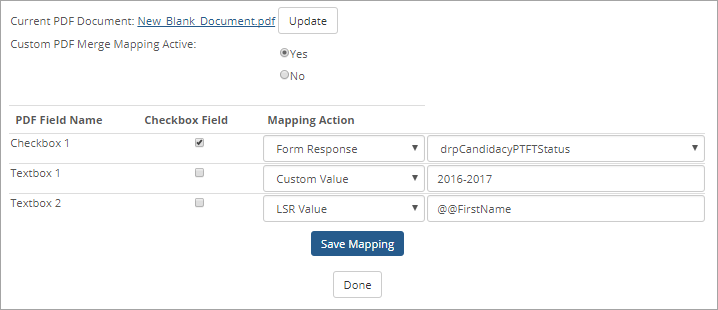
To make the mapping active for this form and PDF, go to the Custom PDF Merge Mapping Active option and select Yes. If you wish to keep the mapping inactive for this form and PDF, select No.
|
When the Custom PDF Merge Mapping Active is set to Yes, FormFlow will fill the mapped answers into the custom PDF and will use the resulting file anywhere the submission PDF is referenced. If it is set to No, the default report view will be converted into a PDF and used instead. |
You will need to configure the mapping for each fillable field on the PDF form:
If the field on the PDF form is a checkbox field, go to the Checkbox Field column and select the corresponding checkbox. FormFlow fields mapped to a PDF checkbox field must have a Boolean value (i.e. true, TRUE, 1) and can be a checkbox, drop-down, or radio button. If the FormFlow field is a checkbox question with multiple options or non-Boolean values, do NOT select the Checkbox Field option and instead see step b for how to map the value as a form response.
Click on the Mapping Action drop-down and select one of the options listed below. Example
None ??? No value will be populated for this field.
Custom Value ??? A static value will be entered into this field on the form. Enter in the static value that will be entered into the PDF form field. Example: if the field is for the fiscal year, you can enter in the static value of "2016-2017" so that it will be automatically entered into the PDF field for each form submission.
Form Response ??? The response from a specific question will be used to fill the specified field on the PDF form. Select the Unique ID of the FormFlow form item you wish to populate the PDF form field from the drop-down list that appears. Example: if you select Email from the drop-down, FormFlow will take the user's response to this form question and fill the currently selected PDF form field with that value.
Once you are done configuring the mapping settings for each field on the PDF form, click Save Mapping. The changes are saved.
Click Done. You are redirected back to your FormFlow form.
Set up a Form to Send an Email with the Completed PDF Attached
Before following these steps, you must follow the steps outlined above and first add and map a fillable PDF to the form with the Custom PDF Merge Mapping Active option set to Yes.
Navigate to the FormFlow - Forms instance.
Click the Manage Forms link. The Manage Forms page appears.
Click the form you wish to configure the PDF email attachment for. The form page appears.
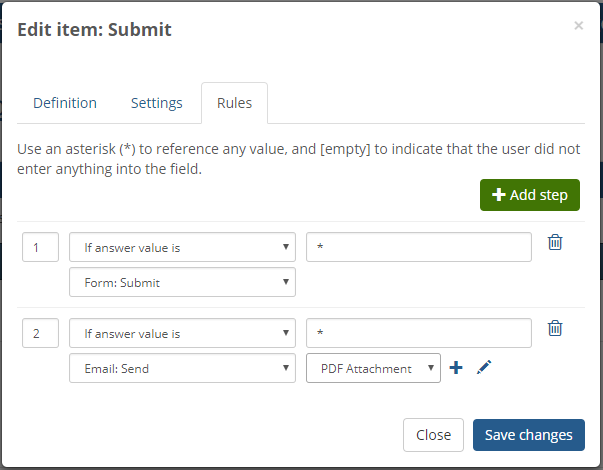
Navigate to the button you wish to add the Email: Send rule to. For example, you can add this rule to a Submit button at the end of your form.
Right click on the button and select Properties. The Edit Item popup appears.
Navigate to the Rules tab.
Click Add Step. Fields to enter a new rule appear.
From the condition drop-down, select If answer value is.
In the answer value field to the right, enter *. Example. Entering in this value will ensure that FormFlow executes the action when the button is clicked by the user.
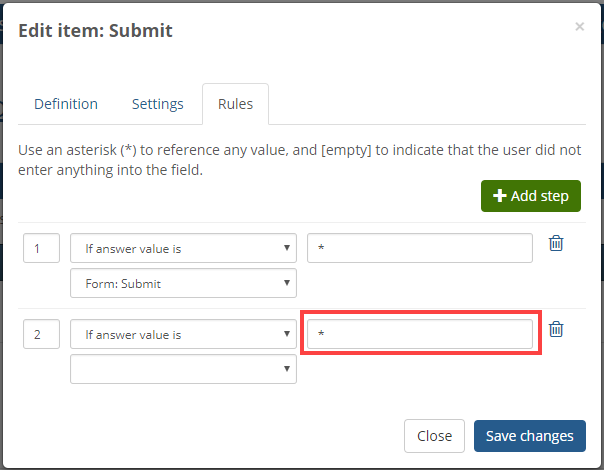
From the action drop-down, select Email: Send. An email template drop-down appears to the right.
If you have previously created an email template setup for sending the completed PDF, select it from the email template drop-down.
If
you do not currently have an email template setup for sending
the completed PDF, click the Add icon.
The email template setup appears in the Edit Item popup. Example
icon.
The email template setup appears in the Edit Item popup. Example
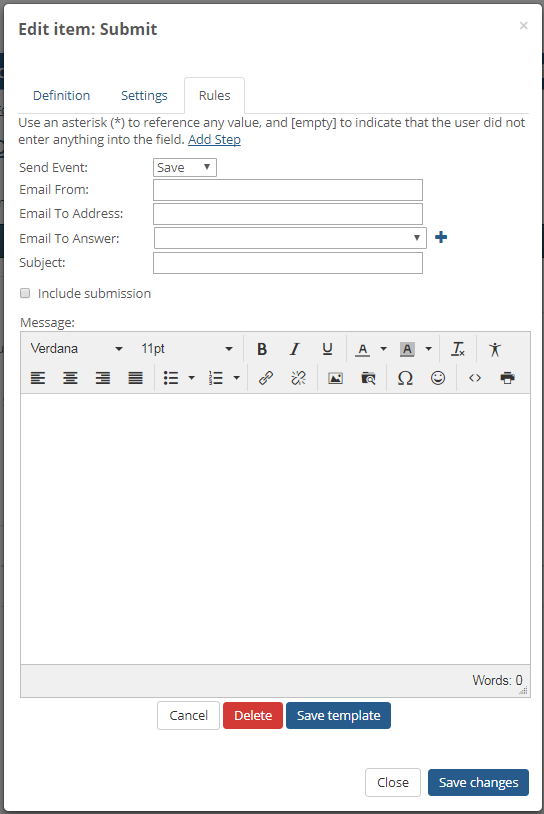
From the Send Event drop-down, select either Save or Submit.
|
For example, if you have setup your Submit button to execute the Form: Submit rule, you can choose Submit from the Send Event drop-down to send the email when the form is submitted. |
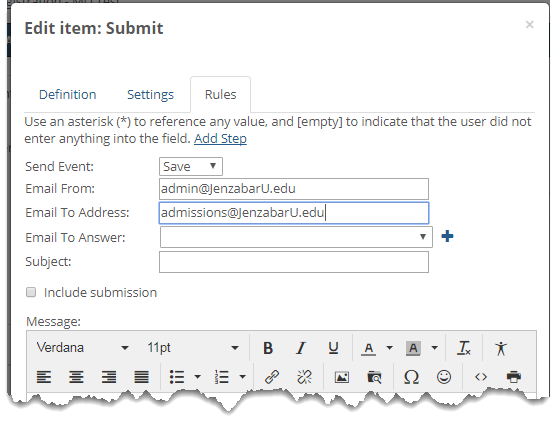
In the Email From field, enter the email address to be used as the sender's email. The email address must be in the same domain as your JICS server. If you do not enter an email address, the JICS Default SMTP address is used (configured in Site Manager > Framework Settings > Email).
If you wish to send the completed PDF form to a specific email address, in the Email To Address field, enter in the email address you wish to send the completed PDF form to. For example, if you want to send all the completed PDF forms for this particular form to the admissions office, you can enter in the email address for your school's admissions office. Example. The email address is added and appears in a light blue box below.
If you wish to send the completed PDF form to an email address the recipient entered in a question field, in the Email To Answer drop-down, select the Unique ID of the corresponding question.
In the Subject field, enter in the subject line for the email. You can use literal string replacers such as @@FirstName or unique IDs of questions such as {ZipCode} to add information to the email based on information they entered in the form.
Check the Include Submission checkbox. This will ensure the PDF for the form submission is included in the email as an attachment. An Attachment Name Format field appears.
In the Attachment Name Format field, enter in the format you would like the PDF name to be saved in. You can use string replacers in your attachment name format such as @@FirstName or the unique IDs of questions such as {LastName}. For example, if you enter @@FirstName-{LastName} into the Attachment Name Format field, and Nancy Wheeler submits the form, FormFlow will pull the user's first name and the value the user enters in the LastName field to name the attachment "Nancy-Wheeler.pdf".
|
If no Attachment Name Format is provided, the default attachment will be named "SubmissionYYYY-MM-DD.pdf". |
In the Message field, enter the content of your email. You can use literal string replacers such as @@FirstName, unique IDs of questions such as {ZipCode}, update the format, create bullet and numbered lists, add a link, include an image or file, and work directly with the HTML.
Click Save Template. You are redirected back to the Rules tab.
From the email template drop-down, select the email template you just created. Example
|
The email template's name is the same as what you entered into the Subject field. |
Click Save Changes. The Edit Item popup closes.


